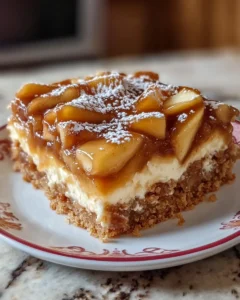
There’s something irresistible about the combination of sweet, gooey caramel, crisp apples, and creamy cheesecake. These Homemade Caramel Apple Cheesecake Bars are the perfect treat for cozy evenings at home, festive fall gatherings, or whenever you crave a dessert that feels like a warm hug. Inspired by the classic autumn flavors of caramel apples, this recipe brings all the indulgence of a carnival favorite into your kitchen in an easy-to-serve bar form.
Imagine biting into a soft, buttery crust topped with tangy cream cheese, tender cinnamon-spiced apples, and drizzled with rich caramel sauce. The first taste will transport you to crisp fall afternoons, the scent of fresh apples, and the comforting aroma of baked sweets filling your home. These bars aren’t just delicious—they’re versatile enough to serve at a dinner party, a holiday potluck, or as a special treat for the family.
Whether you’re a seasoned baker or just starting, this recipe is approachable and fun, letting you create a dessert that’s as beautiful as it is scrumptious. By the end, you’ll have a tray of bars that look gourmet but are surprisingly simple to make, perfect for sharing—or keeping all to yourself.
Ingredients
For the Crust:
-
1 ½ cups graham cracker crumbs
-
½ cup unsalted butter, melted
-
¼ cup granulated sugar
For the Cheesecake Layer:
-
16 oz (2 packages) cream cheese, softened
-
½ cup granulated sugar
-
2 large eggs
-
1 tsp vanilla extract
-
1 tsp lemon juice
For the Apple Layer:
-
3 medium apples, peeled, cored, and diced
-
2 tbsp unsalted butter
-
¼ cup brown sugar
-
1 tsp ground cinnamon
-
½ tsp ground nutmeg
For the Caramel Topping:
-
½ cup caramel sauce (store-bought or homemade)
-
Optional: sea salt for sprinkling
Directions
-
Prepare the Crust
Preheat your oven to 350°F (175°C). In a medium bowl, combine graham cracker crumbs, melted butter, and sugar. Mix until evenly combined. Press the mixture firmly into the bottom of a greased 9×13-inch baking pan. Bake for 8-10 minutes, until lightly golden. Remove from oven and set aside to cool slightly. -
Make the Cheesecake Layer
In a large bowl, beat the softened cream cheese with sugar until smooth and creamy. Add the eggs one at a time, beating well after each addition. Mix in vanilla extract and lemon juice. Pour the cheesecake mixture over the baked crust, spreading evenly with a spatula. -
Cook the Apples
In a medium skillet, melt butter over medium heat. Add diced apples, brown sugar, cinnamon, and nutmeg. Cook for 5-7 minutes, stirring occasionally, until the apples are slightly softened but still hold their shape. Remove from heat and allow to cool for a few minutes. -
Assemble the Bars
Spoon the cooked apples evenly over the cheesecake layer. Gently press them into the cheesecake to create a cohesive layer. Drizzle the caramel sauce over the apples. If desired, sprinkle a pinch of sea salt to enhance the flavors. -
Bake the Bars
Reduce oven temperature to 325°F (160°C). Bake the assembled bars for 25-30 minutes, until the cheesecake layer is set but still slightly jiggly in the center. Remove from oven and let cool completely at room temperature. -
Chill and Serve
Refrigerate the bars for at least 2 hours, or overnight for best results. Once chilled, cut into squares and serve. For an extra touch, drizzle more caramel sauce over each bar before serving.
Tips for Perfect Caramel Apple Cheesecake Bars
-
Choose the Right Apples: Tart varieties like Granny Smith or Honeycrisp work best as they balance the sweetness of the caramel and cheesecake.
-
Avoid Overcooking Apples: You want tender apples with a slight bite, not mushy pieces that sink into the cheesecake.
-
Cream Cheese at Room Temperature: This ensures a smooth, lump-free cheesecake layer.
-
Make Ahead: These bars taste even better the next day as the flavors meld together.
Why You’ll Love This Recipe
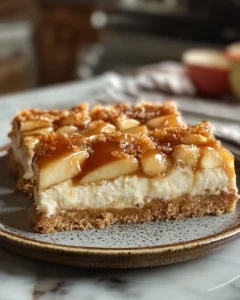
These cheesecake bars combine three classic dessert elements—cheesecake, apples, and caramel—into one convenient treat. They’re not only delicious but also visually impressive, making them perfect for entertaining. Unlike a traditional cheesecake, bars are easier to slice and serve, which is great when feeding a crowd. Plus, the combination of textures—crumbly crust, creamy cheesecake, soft spiced apples, and sticky caramel—is utterly satisfying.
Whether you’re making them for a seasonal celebration, a birthday, or just a weekend indulgence, they bring warmth and comfort with every bite. They’re also versatile—you can experiment with toppings, like a sprinkle of chopped pecans or a light dusting of cinnamon sugar, to make them uniquely yours.
Frequently Asked Questions
Can I use store-bought caramel sauce?
Absolutely! Store-bought caramel sauce works wonderfully for these cheesecake bars, saving you time while still delivering a rich, buttery sweetness that complements the apples and cheesecake perfectly. Many people assume homemade caramel is the only way to get an indulgent flavor, but high-quality store-bought options can be just as satisfying. If you want to elevate the bars even further, you can drizzle a little extra caramel on top just before serving. For those who enjoy a more hands-on approach, making homemade caramel allows you to control the sweetness and texture. A homemade sauce tends to be slightly thicker and richer, giving your bars a luxurious, decadent touch that’s perfect for special occasions or holidays.
Can these bars be made ahead of time?
Yes! One of the best things about caramel apple cheesecake bars is that they actually improve in flavor after sitting in the refrigerator for a few hours. Chilling the bars allows the cheesecake layer to firm up and the apple and caramel layers to meld together, enhancing the overall taste and texture. You can prepare the bars a day—or even two days—ahead of time, making them a convenient dessert for parties, potlucks, or family gatherings. Simply cover the pan tightly with foil or plastic wrap and store it in the fridge until you’re ready to serve. Just remember to cut them after chilling for the cleanest slices. This make-ahead option is perfect for bakers who want to reduce last-minute kitchen stress while still serving a homemade dessert that looks impressive.
Can I freeze these bars?
Yes, these bars freeze very well, making them a great option for batch baking or saving leftovers. After baking and cooling completely, wrap the pan tightly with plastic wrap and then a layer of foil to prevent freezer burn. You can freeze the bars for up to 2 months without losing flavor or texture. When you’re ready to enjoy them, simply thaw the bars overnight in the refrigerator. If you like a slightly softer texture, you can leave them at room temperature for 30–60 minutes before serving. Freezing is also handy if you want to prepare desserts ahead of holidays or for gifting—these bars maintain their creamy, caramel-apple flavor even after freezing.
Can I use a different type of crust?
Definitely! While a classic graham cracker crust is traditional and pairs perfectly with the creamy cheesecake and spiced apples, you have plenty of creative options. Crushed digestive biscuits, buttery shortbread, or even gingersnap cookies can be used to create a crust with unique flavor notes. For a more autumnal twist, gingerbread or cinnamon-flavored cookies can add extra warmth and spice. Each alternative crust brings its own texture and taste, allowing you to customize the bars to your personal preference or match the season. Experimenting with different crusts is also a fun way to make this recipe your own while keeping the same delicious layers of cheesecake, apples, and caramel on top.
Variations and Customizations
-
Nutty Twist: Sprinkle chopped walnuts or pecans over the caramel layer for added crunch.
-
Spiced Up: Add a pinch of ground cloves or allspice to the apple mixture for a deeper autumn flavor.
-
Chocolate Lovers: Drizzle melted chocolate over the top along with the caramel for a decadent twist.
-
Mini Bars: Make these in a muffin tin for individual servings—perfect for parties or lunchboxes.
Serving Suggestions
Serve these bars slightly chilled for a firm texture or at room temperature for a softer bite. Pair with a scoop of vanilla ice cream or a dollop of whipped cream for an extra indulgent treat. They also make a stunning dessert for Thanksgiving, Halloween, or any cozy autumn gathering.
If you’re hosting, consider presenting them on a rustic wooden board or a decorative plate to highlight the layers of crust, cheesecake, apples, and caramel. They’re as visually appealing as they are delicious, making them a crowd-pleaser every time.
Storage Tips
Store leftover bars in an airtight container in the refrigerator for up to 4-5 days. For longer storage, freeze individual bars as needed. Reheat gently in the microwave if you prefer a softer texture, but they’re perfect straight from the fridge as well.
The Perfect Occasion for These Bars
These Caramel Apple Cheesecake Bars are ideal for:
-
Fall and holiday gatherings: Their warm flavors fit perfectly with the season.
-
Dinner parties: Easy to slice and serve, with impressive flavor.
-
Special family treats: A weekend baking project that everyone will enjoy.
-
Gift-giving: Wrap bars in parchment and tie with a ribbon for a homemade dessert gift.
No matter the occasion, these bars deliver a combination of flavors and textures that make every bite memorable.
Final Thoughts
If you’re searching for a dessert that is both comforting and elegant, these Homemade Caramel Apple Cheesecake Bars are a must-try. They combine the sweet nostalgia of caramel apples with creamy cheesecake and a buttery crust in a way that’s easy to bake and even easier to enjoy. Perfect for sharing, gifting, or keeping all to yourself, this recipe is a fall favorite that will surely become a staple in your dessert repertoire.
Take your next cozy evening or holiday celebration to the next level with these bars—they’re the ultimate crowd-pleaser, and the perfect way to indulge in classic flavors with a gourmet touch. Once you try them, you’ll see why this recipe is a keeper for every season and occasion.
Print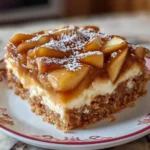
Homemade Caramel Apple Cheesecake Bars for Dessert
- Total Time: 2 hours 15 minutes (including chilling)
- Yield: 16 bars 1x
Description
A perfect dessert for cozy evenings or festive fall gatherings, these cheesecake bars combine the sweet nostalgia of caramel apples with a creamy cheesecake layer and a buttery crust. Easy to make and irresistible to taste, they’re ideal for sharing with family and friends or enjoying as a special treat.
Ingredients
For the Crust:
-
1 ½ cups graham cracker crumbs
-
½ cup unsalted butter, melted
-
¼ cup granulated sugar
For the Cheesecake Layer:
-
16 oz (2 packages) cream cheese, softened
-
½ cup granulated sugar
-
2 large eggs
-
1 tsp vanilla extract
-
1 tsp lemon juice
For the Apple Layer:
-
3 medium apples, peeled, cored, and diced
-
2 tbsp unsalted butter
-
¼ cup brown sugar
-
1 tsp ground cinnamon
-
½ tsp ground nutmeg
For the Caramel Topping:
-
½ cup caramel sauce (store-bought or homemade)
-
Optional: sea salt for sprinkling
Instructions
-
Preheat the oven to 350°F (175°C). In a medium bowl, combine graham cracker crumbs, melted butter, and sugar. Press the mixture firmly into the bottom of a greased 9×13-inch baking pan. Bake for 8–10 minutes until lightly golden. Set aside to cool slightly.
-
In a large bowl, beat softened cream cheese with sugar until smooth. Add eggs one at a time, mixing well after each. Stir in vanilla extract and lemon juice. Pour over the baked crust and spread evenly.
-
In a skillet, melt butter over medium heat. Add diced apples, brown sugar, cinnamon, and nutmeg. Cook for 5–7 minutes until apples are slightly softened but still firm. Remove from heat and cool slightly.
-
Spoon cooked apples evenly over the cheesecake layer and gently press them in. Drizzle caramel sauce over the top and sprinkle with sea salt if desired.
-
Reduce oven temperature to 325°F (160°C) and bake for 25–30 minutes until the cheesecake is set but slightly jiggly in the center. Cool completely at room temperature.
-
Refrigerate for at least 2 hours or overnight. Cut into squares and serve, optionally drizzling extra caramel on top.
Notes
For best results, chill bars for at least 2 hours before slicing. Experiment with different apple varieties or crust options for customized flavor.
- Prep Time: 20 minutes
- Cook Time: 45 minutes