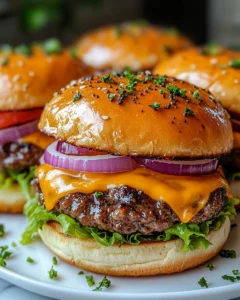
There’s something irresistibly comforting about gathering around a table filled with bite-sized delights, especially when those bites are warm, cheesy, and packed with flavor. Mini cheeseburger sliders are the perfect addition to any occasion—whether it’s a cozy family movie night, a lively game day, or a casual weekend get-together with friends. Their small size makes them easy to share, while their bold flavor makes them unforgettable.
This recipe was inspired by the classic backyard burger but reimagined for convenience and fun. Sliders bring that nostalgic taste of summer cookouts into a format that’s perfect year-round. With juicy beef patties, soft buns, and perfectly melted cheese, these mini burgers are simple yet satisfying, delivering big flavor in every bite.
Why You’ll Love These Mini Cheeseburger Sliders
Mini cheeseburger sliders are more than just adorable—they’re incredibly practical and versatile. These little burgers are easy to prepare in batches, making them ideal for feeding a crowd without spending hours in the kitchen. Because they’re smaller than traditional burgers, they cook quickly and evenly, ensuring consistent results every time.
Another reason to love sliders is their adaptability. You can customize them with your favorite toppings, cheeses, and sauces. Whether you prefer classic flavors or want to experiment with something new, sliders give you the flexibility to get creative.
Additionally, these sliders are perfect for portion control. Guests can enjoy one or several without feeling overwhelmed, making them a great option for buffets and parties.
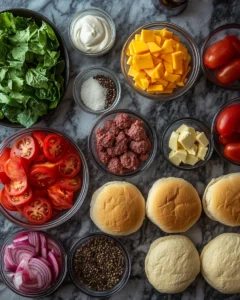
Ingredients
Here’s everything you’ll need to create delicious mini cheeseburger sliders:
- 500 g ground beef (80% lean)
- 1 teaspoon salt
- 1/2 teaspoon black pepper
- 1/2 teaspoon garlic powder
- 1/2 teaspoon onion powder
- 12 slider buns
- 6 slices cheddar cheese (cut into halves)
- 1 tablespoon olive oil
- 1 small onion, finely chopped (about 100 g)
- 1 tablespoon butter (14 g)
- 2 tablespoons mayonnaise (30 g)
- 2 tablespoons ketchup (30 g)
- 1 tablespoon mustard (15 g)
- 6 lettuce leaves, cut into small pieces
- 1 medium tomato, sliced thin (about 150 g)
- 6 pickle slices, halved
- Sesame seeds (optional, for topping)
Step-by-Step Instructions
1. Prepare the Beef Mixture
In a large bowl, combine the ground beef, salt, black pepper, garlic powder, and onion powder. Mix gently until just combined. Avoid overmixing, as this can make the patties tough.
2. Shape the Mini Patties
Divide the beef mixture into 12 equal portions (about 40–45 g each). Roll each portion into a ball, then flatten into small patties slightly larger than the slider buns, as they will shrink during cooking.
3. Cook the Patties
Heat a skillet or grill pan over medium-high heat and add olive oil. Cook the patties for about 2–3 minutes per side, or until fully cooked and nicely browned.
4. Add the Cheese
Place half a slice of cheddar cheese on each patty during the last minute of cooking. Cover the pan briefly to allow the cheese to melt perfectly.

5. Toast the Buns
Slice the slider buns in half and lightly toast them in a pan with butter until golden brown. This adds flavor and prevents sogginess.
6. Assemble the Sliders
Spread mayonnaise, ketchup, and mustard on the buns. Add a lettuce piece, the cheesy patty, caramelized onions, tomato slice, and pickle. Top with the bun lid.
7. Serve Warm
Arrange the sliders on a serving tray and serve immediately while warm and melty.
Tips for Perfect Sliders
- Use slightly fatty ground beef (around 80% lean) for juicy patties.
- Don’t press down on the patties while cooking—this releases juices.
- Toasting the buns enhances flavor and texture.
- Melt cheese properly by covering the pan briefly.
- Keep sliders warm in the oven at low temperature if serving a crowd.
Creative Variations
One of the best things about mini cheeseburger sliders is how easily you can customize them:
- Spicy Sliders: Add chili flakes or sliced jalapeños.
- BBQ Style: Replace ketchup with barbecue sauce and add grilled onions.
- Mushroom Sliders: Top with sautéed mushrooms for extra depth.
- Garlic Butter Buns: Brush buns with garlic butter before toasting.
- Chicken Sliders: Substitute ground beef with ground chicken for a lighter version.
Serving Suggestions
Mini cheeseburger sliders pair beautifully with a variety of sides:
- Crispy baked potato wedges
- Sweet potato fries
- Fresh green salad
- Coleslaw
- Corn on the cob
For gatherings, consider serving them alongside a dipping sauce platter with options like garlic sauce, spicy mayo, or honey mustard.
Storage and Reheating Tips
If you have leftovers, store the patties and buns separately in airtight containers in the refrigerator for up to 3 days. Reheat patties in a skillet over medium heat or in the oven at 180°C until warmed through.
Avoid microwaving assembled sliders, as this can make the buns soggy. Instead, reassemble after reheating for the best texture.
Frequently Asked Questions
1. Can I make sliders ahead of time?
Yes, you can prepare the patties in advance and store them in the refrigerator for up to 24 hours before cooking. You can also cook the patties ahead and reheat them when ready to serve. However, for the best taste and texture, assemble the sliders just before serving. This prevents the buns from becoming soggy and keeps the ingredients fresh and vibrant.
If you’re planning for a party, consider prepping all the components—washed lettuce, sliced tomatoes, sauces, and buns—so everything is ready to go. This makes assembly quick and stress-free.
2. What’s the best cheese to use for sliders?
Cheddar cheese is a classic choice because it melts well and has a rich flavor. However, you can experiment with other cheeses like mozzarella, Swiss, or gouda depending on your taste preferences.
The key is to choose a cheese that melts smoothly and complements the beef. Pre-sliced cheese is convenient, but freshly sliced cheese often melts better and has superior flavor.
3. How do I keep sliders warm for a party?
To keep sliders warm, place them in an oven set to a low temperature (around 90–100°C). Cover them loosely with foil to prevent drying out.
Another method is to keep the patties warm separately and assemble sliders as guests arrive. This ensures each slider is fresh and warm. If using a slow cooker, place patties inside on the warm setting.
4. Can I freeze mini burger patties?
Yes, mini burger patties freeze very well. Arrange uncooked patties on a baking sheet and freeze until solid, then transfer to a freezer-safe bag or container.
When ready to use, cook them directly from frozen or thaw in the refrigerator overnight. This makes meal prep easier and allows you to have sliders ready anytime.
Final Thoughts
Mini cheeseburger sliders with melted cheese are the ultimate crowd-pleaser, combining simplicity, flavor, and fun in one compact bite. Whether you’re hosting a party or just looking for a quick and satisfying meal, these sliders deliver every time. Their versatility allows you to adapt them to any occasion, from casual gatherings to more festive celebrations.
What makes sliders truly special is their ability to bring people together. There’s something about sharing small, delicious bites that creates a warm and inviting atmosphere. Guests can mix and match flavors, try different toppings, and enjoy the experience without the formality of a full-sized meal.
From a practical standpoint, sliders are also incredibly efficient. They cook quickly, require minimal ingredients, and can be easily scaled up or down depending on your needs. This makes them a reliable go-to recipe for both beginners and experienced cooks.
If you’re looking to elevate your sliders, consider experimenting with sauces, cheeses, and toppings. Even small tweaks can create entirely new flavor profiles, keeping the recipe exciting every time you make it.
Ultimately, mini cheeseburger sliders are more than just food—they’re an experience. They’re about sharing, enjoying, and creating moments around the table. Once you try this recipe, it’s sure to become a regular favorite in your kitchen.
Print
Mini Cheeseburger Sliders with Melted Cheese
- Total Time: 25 minutes
- Yield: 12 sliders 1x
Description
A delicious and easy-to-make slider recipe featuring juicy beef patties, melted cheese, and fresh toppings—perfect for gatherings or quick meals.
Ingredients
500 g ground beef
1 teaspoon salt
1/2 teaspoon black pepper
1/2 teaspoon garlic powder
1/2 teaspoon onion powder
12 slider buns
6 slices cheddar cheese (cut in half)
1 tablespoon olive oil
1 small onion, finely chopped (100 g)
1 tablespoon butter (14 g)
2 tablespoons mayonnaise (30 g)
2 tablespoons ketchup (30 g)
1 tablespoon mustard (15 g)
6 lettuce leaves
1 medium tomato (150 g), sliced
6 pickle slices, halved
Instructions
Mix ground beef with salt, pepper, garlic powder, and onion powder.
Divide into 12 portions and shape into small patties.
Cook patties in a skillet with olive oil for 2–3 minutes per side.
Add cheese during the last minute and cover to melt.
Toast buns with butter until golden.
Spread sauces on buns, add lettuce, patty, onions, tomato, and pickles.
Notes
Use 80% lean beef for best flavor and juiciness.
Toast buns to avoid soggy sliders.
Customize toppings to suit your taste.
Serve immediately for best texture and flavor.
- Prep Time: 15 minutes
- Cook Time: 10 minutes