
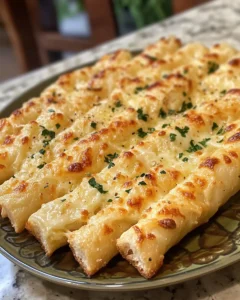
There’s nothing quite as comforting as the smell of freshly baked bread filled with melted cheese and savory garlic. Cheesy garlic breadsticks are the ultimate treat, perfect for a cozy evening at home, a fun family dinner, or even as a party appetizer that disappears in minutes. This recipe brings together the warm, soft texture of homemade bread with the rich, flavorful punch of garlic and melted cheese—making it irresistible for kids and adults alike.
Inspired by the classic Italian tradition of serving breadsticks alongside pasta dishes, this recipe takes the essence of those soft, flavorful bites and simplifies it for any home cook. Whether you’re hosting a casual dinner, preparing a movie night snack, or simply craving something indulgent and satisfying, these cheesy garlic breadsticks are your go-to solution. With minimal ingredients and straightforward steps, anyone can master this quick and simple recipe while achieving bakery-quality results at home.
Ingredients
-
1 cup warm water (110°F/45°C)
-
2 ¼ teaspoons active dry yeast (1 packet)
-
2 tablespoons granulated sugar
-
3 cups all-purpose flour
-
1 teaspoon salt
-
2 tablespoons olive oil
-
3 tablespoons unsalted butter, melted
-
3–4 cloves garlic, finely minced
-
1 ½ cups shredded mozzarella cheese
-
½ teaspoon dried oregano (optional)
-
½ teaspoon dried parsley (optional)
Directions
-
Activate the yeast: In a small bowl, combine the warm water, sugar, and yeast. Stir gently and let it sit for 5–10 minutes until the mixture becomes frothy, indicating the yeast is active.
-
Prepare the dough: In a large mixing bowl, combine the flour and salt. Gradually add the yeast mixture and olive oil, mixing until a soft dough forms.
-
Knead the dough: Transfer the dough to a floured surface and knead for 6–8 minutes until it becomes smooth and elastic. If the dough is too sticky, sprinkle with a little extra flour as needed.
-
First rise: Place the kneaded dough in a lightly greased bowl, cover it with a clean kitchen towel, and let it rise in a warm place for 1–1.5 hours, or until it doubles in size.
-
Preheat the oven: Once the dough has risen, preheat your oven to 400°F (200°C). Line a baking sheet with parchment paper or lightly grease it.
-
Shape the breadsticks: Punch down the dough to release air and divide it into 10–12 equal portions. Roll each portion into a long, thin stick, approximately 6–8 inches in length.
-
Prepare the garlic butter: In a small bowl, mix the melted butter with minced garlic. For extra flavor, you can also add dried parsley or oregano at this stage.
-
Assemble the breadsticks: Place the dough sticks on the prepared baking sheet. Brush each one generously with the garlic butter mixture. Sprinkle shredded mozzarella evenly over the top of each breadstick.
-
Bake: Bake in the preheated oven for 12–15 minutes, or until the breadsticks are golden brown and the cheese is melted and bubbly.
-
Finishing touches: Remove from the oven and allow the breadsticks to cool slightly. Brush again with any remaining garlic butter for an extra layer of flavor before serving.
-
Serve and enjoy: These cheesy garlic breadsticks are perfect as a side dish with pasta, a snack for game night, or as a centerpiece at your next casual gathering. Serve warm for the best experience.
Tips for the Perfect Cheesy Garlic Breadsticks
-
Use room temperature ingredients: Yeast activates best with water that’s warm but not hot. Too hot water can kill the yeast, while too cold won’t activate it properly.
-
Cheese choice matters: While mozzarella provides a classic gooey texture, you can also mix in cheddar or provolone for additional flavor.
-
Don’t skip the butter brushing: Garlic butter enhances both the taste and appearance of the breadsticks, giving them a glossy, golden finish.
-
Optional herbs: Sprinkle oregano or parsley before baking for an aromatic and visually appealing result.
-
Make ahead: Dough can be prepared in advance and refrigerated for up to 24 hours. Allow it to come to room temperature before shaping and baking.
Why This Recipe Works
Cheesy garlic breadsticks are a combination of simple ingredients and clever technique. The yeast dough provides a soft, pillowy texture, while the garlic butter and cheese add layers of flavor that melt perfectly in your mouth. The result is a versatile dish that can be paired with soups, salads, pasta, or enjoyed on its own.
The magic lies in the balance: not too much cheese to overpower the bread, just enough butter to enrich the flavor, and perfectly kneaded dough that rises to soft perfection. Unlike frozen or store-bought versions, these breadsticks are warm, fresh, and customizable according to your taste.
Serving Suggestions
Cheesy garlic breadsticks can be paired with a variety of dishes or served as a standalone snack. Here are some ideas:
-
With pasta dishes: Serve alongside spaghetti, fettuccine alfredo, or lasagna to soak up sauces.
-
As a dipping treat: Pair with marinara, ranch, or garlic parmesan dipping sauce.
-
At parties: Arrange on a platter with fresh herbs sprinkled on top for a visually appealing appetizer.
-
For breakfast or brunch: Enjoy alongside scrambled eggs or an omelet for a savory start to the day.
Healthier Alternatives
If you’re looking to make this recipe a bit lighter:
-
Whole wheat flour: Replace half of the all-purpose flour with whole wheat for a nuttier flavor and added fiber.
-
Reduced-fat cheese: Use part-skim mozzarella to cut down on calories while maintaining gooeyness.
-
Light butter or olive oil: Substitute part of the butter with olive oil to reduce saturated fat.
These simple swaps maintain the flavor and texture while offering a slightly healthier option.
Frequently Asked Questions
1. Can I freeze cheesy garlic breadsticks?
Yes! Once baked, allow them to cool completely, then wrap individually in plastic wrap and place in a freezer-safe bag. They can be frozen for up to 2 months. To reheat, bake in a preheated oven at 350°F (175°C) for 10–12 minutes until warm and the cheese is bubbly.
2. Can I make these gluten-free?
Absolutely. Use a high-quality gluten-free flour blend suitable for yeast breads. Keep in mind that texture may vary slightly, so follow the package instructions for hydration and kneading adjustments.
3. How can I make them extra cheesy?
For cheese lovers, sprinkle additional mozzarella or a mix of cheeses halfway through baking for an extra gooey layer. Parmesan can also be added on top for a golden, savory crust.
4. Can I add toppings?
Yes! Feel free to experiment with toppings like finely chopped jalapeños, sun-dried tomatoes, or a sprinkle of Italian seasoning. Just ensure toppings are not too heavy to affect dough rising.
Why Everyone Will Love This Recipe
Cheesy garlic breadsticks appeal to all ages because of their soft, flavorful bread and gooey, melty cheese. They’re a perfect example of comfort food made simple, combining the best of homemade cooking with a quick preparation time. By making them at home, you control the ingredients, freshness, and seasoning—unlike pre-packaged options that can feel processed and lack flavor.
The recipe also encourages creativity. Kids can help shape the breadsticks, adults can experiment with different cheeses or herbs, and everyone benefits from the warm, inviting aroma that fills the kitchen. These breadsticks aren’t just food—they’re a shared experience, a centerpiece for gatherings, and a symbol of homemade goodness.
Variations to Try
-
Cheesy Herb Breadsticks: Add fresh rosemary or thyme to the dough for a fragrant twist.
-
Spicy Garlic Breadsticks: Sprinkle crushed red pepper flakes into the garlic butter for a mild kick.
-
Stuffed Breadsticks: Roll a small piece of mozzarella inside the dough before baking for an extra cheesy surprise.
-
Parmesan Garlic Breadsticks: Mix grated Parmesan with butter and garlic for a sharper, richer flavor.
-
Vegan Option: Use a dairy-free cheese and plant-based butter to enjoy a fully vegan version without sacrificing taste.
Storing and Reheating Tips
-
Room temperature: Store baked breadsticks in an airtight container for up to 2 days.
-
Reheating: Warm in the oven at 350°F (175°C) for 5–8 minutes to refresh the texture and melt the cheese. Avoid microwaving if possible, as it can make breadsticks soggy.
-
Make-ahead dough: Prepare the dough and refrigerate for up to 24 hours. Allow it to come to room temperature, shape, and bake as usual.
Final Thoughts
Cheesy garlic breadsticks are a timeless comfort food that brings warmth and flavor to any table. With minimal ingredients and simple steps, you can create bakery-quality breadsticks that everyone will love. Perfect for weeknight dinners, gatherings, or as a standalone snack, this recipe is versatile, customizable, and guaranteed to impress.
By taking the time to make these breadsticks at home, you’re not just preparing food—you’re creating an experience. From the first aroma of garlic melting in butter to the satisfying stretch of melted cheese, each bite is a reminder of why homemade comfort food is always worth the effort.
Whether you’re new to baking or a seasoned cook, this Cheesy Garlic Breadsticks Quick and Simple recipe is an easy, rewarding way to bring joy to your kitchen and your loved ones.
Print
Cheesy Garlic Breadsticks Quick and Simple
- Total Time: 1 hour 35 minutes
- Yield: 10–12 breadsticks 1x
Description
These cheesy garlic breadsticks are soft, fluffy, and loaded with gooey melted cheese and savory garlic flavor. Perfect for a cozy night in, a family dinner, or a snack during movie night, this quick and simple recipe brings the warm, comforting taste of homemade bread to your table with minimal effort. Inspired by traditional Italian breadsticks, they’re easy to make, customizable, and sure to be a hit with kids and adults alike.
Ingredients
-
1 cup warm water (110°F/45°C)
-
2 ¼ teaspoons active dry yeast (1 packet)
-
2 tablespoons granulated sugar
-
3 cups all-purpose flour
-
1 teaspoon salt
-
2 tablespoons olive oil
-
3 tablespoons unsalted butter, melted
-
3–4 cloves garlic, finely minced
-
1 ½ cups shredded mozzarella cheese
-
½ teaspoon dried oregano (optional)
-
½ teaspoon dried parsley (optional)
Instructions
-
In a small bowl, combine warm water, sugar, and yeast. Stir and let sit 5–10 minutes until frothy.
-
In a large bowl, mix flour and salt. Gradually add yeast mixture and olive oil, stirring until a soft dough forms.
-
Knead the dough on a floured surface for 6–8 minutes until smooth and elastic. Add extra flour if sticky.
-
Place dough in a greased bowl, cover with a towel, and let rise 1–1.5 hours until doubled in size.
-
Preheat oven to 400°F (200°C) and prepare a baking sheet with parchment paper or grease.
-
Punch down dough and divide into 10–12 portions. Roll each into 6–8 inch sticks.
-
Mix melted butter with minced garlic (and optional herbs).
-
Place breadsticks on the baking sheet, brush with garlic butter, and sprinkle with mozzarella.
-
Bake 12–15 minutes until golden and cheese is melted.
-
Brush with remaining garlic butter if desired and serve warm.
Notes
Dough can be made ahead and refrigerated overnight. Brush with extra garlic butter after baking for more flavor. Optional herbs like oregano or parsley add extra aroma and visual appeal.
- Prep Time: 20 minutes
- Cook Time: 15 minutes