
There are certain dishes that instantly bring people together, and fully loaded nachos sit proudly at the top of that list. Whether it’s game night with friends, a relaxed family movie evening, or a casual weekend gathering, nachos have a way of turning simple moments into shared experiences. The sound of crispy tortilla chips crunching under layers of melted cheese and vibrant toppings is enough to make anyone pause and savor the moment.
This recipe was inspired by countless attempts to fix the most common nacho problems: soggy chips, uneven cheese coverage, and toppings that fall off with every bite. After experimenting with layering techniques, cheese combinations, and bake times, this version was born. These nachos are intentionally designed so every single chip is crispy, cheesy, and generously topped, ensuring no one is left scraping the tray for the good bits. This is nachos done right—balanced, bold, and completely satisfying.
Why These Nachos Work Every Time
Great nachos aren’t about piling everything on top and hoping for the best. The secret lies in structure and balance. This recipe uses a thoughtful layering method that distributes cheese and toppings evenly, protecting the chips from moisture while ensuring flavor in every bite.
Using a blend of cheeses creates the perfect melt and flavor depth, while pre-baking the chips briefly helps them stay crisp even under generous toppings. The result is a tray of nachos that holds its texture from the first bite to the last, making them ideal for sharing—or not.
Ingredients for Crispy, Cheesy, Fully Loaded Nachos
-
Tortilla chips – 12 oz (340 g), thick-cut preferred
-
Shredded cheddar cheese – 2 cups (200 g)
-
Shredded mozzarella cheese – 1½ cups (150 g)
-
Cooked seasoned ground beef or chicken – 1 lb (450 g)
-
Black beans, rinsed and drained – 1 cup (170 g)
-
Sweet corn kernels – 1 cup (150 g)
-
Red bell pepper, finely diced – 1 medium (about 150 g)
-
Red onion, finely diced – ½ medium (75 g)
-
Jalapeño, thinly sliced (optional) – 1 small
-
Olive oil – 1 tablespoon
-
Ground cumin – 1 teaspoon
-
Smoked paprika – 1 teaspoon
-
Garlic powder – ½ teaspoon
-
Salt – ½ teaspoon
-
Fresh tomatoes, diced – 1 cup (180 g)
-
Green onions, sliced – ¼ cup (30 g)
-
Fresh cilantro, chopped – ¼ cup (15 g)
-
Sour cream – ½ cup (120 g)
-
Guacamole – 1 cup (240 g)
How to Make Crispy, Cheesy, Fully Loaded Nachos
Perfect nachos are all about balance—crispy chips, well-seasoned toppings, and plenty of melted cheese in every bite. By layering thoughtfully and paying attention to timing, you can create nachos that stay crunchy underneath while still being generously loaded on top. Follow these detailed steps to achieve nachos that are bold, flavorful, and irresistible from the first bite to the last.
Step 1: Preheat and Prepare
Start by preheating your oven to 400°F (200°C). A hot oven is essential for melting the cheese quickly without overcooking the chips. While the oven heats, prepare your baking sheet by lining it with parchment paper or lightly greasing it. This step prevents sticking and makes cleanup easier once the nachos are done.
Spread the tortilla chips in a single, even layer across the baking sheet. Slight overlapping is fine, but avoid stacking them too high. When chips are piled on top of one another, the bottom layers can become soggy while the top layers overcook. An even layer ensures every chip gets its fair share of heat, cheese, and toppings, resulting in consistent texture throughout the pan.
Step 2: Season the Protein
Heat a small amount of olive oil in a skillet over medium heat. Add the cooked ground beef or chicken and sprinkle in the cumin, smoked paprika, garlic powder, and salt. Stir well so the spices coat the protein evenly.
Let the mixture cook for 3 to 4 minutes, just long enough to warm it through and allow the spices to bloom. This step intensifies the flavors and ensures the protein is well-seasoned before it goes onto the nachos. Remove the skillet from heat once everything is evenly combined. Adding warm, seasoned protein helps the cheese melt more smoothly once baked.
Step 3: First Layer of Cheese
Sprinkle half of the shredded cheddar and mozzarella evenly over the tortilla chips. This initial cheese layer is a crucial step that many people skip. By adding cheese directly onto the chips first, you create a protective barrier that helps prevent the chips from becoming soggy as toppings are added.
This layer also anchors the toppings in place, ensuring they stick to the chips rather than sliding off when served. Take a moment to distribute the cheese evenly, making sure the edges and corners of the pan are covered.
Step 4: Add the Toppings
Now it’s time to build flavor and texture. Evenly distribute the seasoned protein over the cheese layer, followed by black beans, corn, diced red bell pepper, red onion, and jalapeño slices. Spreading the toppings evenly ensures every bite has a balanced mix of flavors and prevents heavy spots that could weigh down the chips.
Avoid overloading any single area, as too many toppings in one spot can make the chips underneath soft. Balanced distribution keeps the nachos crisp while delivering maximum flavor.
Step 5: Final Cheese Layer
Top everything with the remaining shredded cheese. This second layer of cheese acts as the glue that brings the entire dish together. Be sure to reach the edges and corners of the baking sheet so every section melts evenly.
The combination of cheddar and mozzarella gives you both bold flavor and stretchy melt, creating that classic nacho texture everyone loves.
Step 6: Bake
Place the baking sheet in the preheated oven and bake for 10 to 12 minutes, or until the cheese is fully melted and bubbling. Keep an eye on the nachos during the final minutes, as ovens can vary.
If you’d like extra color and slight crispness on top, switch the oven to broil for an additional 1 to 2 minutes. Watch carefully during this step to avoid burning the cheese or chips.
Step 7: Finish and Serve
Remove the nachos from the oven and immediately sprinkle with diced tomatoes, green onions, and fresh cilantro. Adding these fresh toppings at the end preserves their color and flavor, providing a bright contrast to the rich, melted cheese.
Serve the nachos hot with sour cream and guacamole on the side or drizzled over the top. Enjoy right away for the best texture—crispy, cheesy, and fully loaded in every bite.

Serving Suggestions
These nachos are hearty enough to serve as a main dish, but they also shine as a shareable appetizer. Pair them with a fresh side salad, roasted vegetables, or a simple salsa trio for variety. Serve directly from the baking tray to keep everything warm and inviting.
Frequently Asked Questions
1. How do I prevent my nachos from getting soggy?
Preventing soggy nachos comes down to a few key techniques. First, use thick, sturdy tortilla chips designed to hold toppings. Thin chips tend to break down quickly under heat and moisture. Second, always start with a base layer of cheese directly on the chips before adding wet toppings like beans or tomatoes. This creates a protective barrier. Finally, avoid overloading the nachos with cold toppings before baking; add fresh items like tomatoes, sour cream, and guacamole after they come out of the oven.
2. Can I make these nachos ahead of time?
Nachos are best enjoyed fresh from the oven, but you can prepare components in advance. Cook and season the protein, chop the vegetables, and shred the cheese up to a day ahead. Store everything separately in airtight containers in the refrigerator. When you’re ready to serve, assemble and bake the nachos just before eating. This approach saves time without sacrificing texture or flavor.
3. What cheese works best for nachos?
The best nachos use a combination of cheeses. Cheddar provides bold flavor, while mozzarella adds that irresistible stretch and melt. You can also substitute or add Monterey Jack or Colby Jack for creaminess. Avoid pre-shredded cheese if possible, as it contains anti-caking agents that can affect melting. Freshly shredded cheese melts more smoothly and evenly.
4. How can I customize these nachos for different tastes?
Customization is one of the best things about nachos. You can swap the protein for grilled vegetables, add roasted sweet potatoes, or include olives and pickled onions for extra punch. For heat lovers, add more jalapeños or a spicy sauce drizzle after baking. If serving a crowd, consider dividing the tray into sections with different toppings so everyone gets what they love.
Tips for Perfect Nachos Every Time
-
Use a wide baking sheet so the chips bake in a single layer.
-
Shred your own cheese for better melting.
-
Add fresh toppings after baking to maintain texture.
-
Serve immediately for the best crunch and flavor.
Final Thoughts
Crispy, cheesy, fully loaded nachos are more than just a snack—they’re an experience. They bring people together around the table, encourage sharing, and create a relaxed atmosphere where conversation flows as easily as the toppings pile up. This recipe focuses on doing the simple things right: thoughtful layering, balanced flavors, and attention to texture. By following these steps, you’re guaranteed nachos that hold their crunch, deliver bold flavor, and look just as good as they taste.
What truly sets these nachos apart is their versatility. They can be adapted for different occasions, dietary preferences, and flavor cravings without losing their core appeal. Whether you’re hosting a crowd or treating yourself to a comforting meal, this recipe gives you the confidence that every chip will be worth reaching for.
In a world full of complicated recipes, there’s something refreshing about mastering a classic. These nachos prove that when quality ingredients and smart techniques come together, the result is unforgettable. Once you try them this way, it’s hard to go back to uneven, soggy alternatives. This is nachos done right—crispy, cheesy, and fully loaded from edge to edge.
Print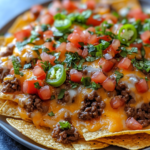
Crispy, Cheesy, Fully Loaded Nachos Done Right
- Total Time: 27 minutes
- Yield: Serves 4–6
Description
These fully loaded nachos are layered for maximum crunch and flavor, ensuring every bite is cheesy, crispy, and satisfying. Perfect for gatherings, game nights, or a fun family meal.
Ingredients
- Tortilla chips – 12 oz (340 g)
- Shredded cheddar cheese – 2 cups (200 g)
- Shredded mozzarella cheese – 1½ cups (150 g)
- Cooked seasoned ground beef or chicken – 1 lb (450 g)
- Black beans, rinsed and drained – 1 cup (170 g)
- Sweet corn kernels – 1 cup (150 g)
- Red bell pepper, finely diced – 1 medium (150 g)
- Red onion, finely diced – ½ medium (75 g)
- Jalapeño, sliced (optional) – 1 small
- Olive oil – 1 tablespoon
- Ground cumin – 1 teaspoon
- Smoked paprika – 1 teaspoon
- Garlic powder – ½ teaspoon
- Salt – ½ teaspoon
- Fresh tomatoes, diced – 1 cup (180 g)
- Green onions, sliced – ¼ cup (30 g)
- Fresh cilantro, chopped – ¼ cup (15 g)
- Sour cream – ½ cup (120 g)
- Guacamole – 1 cup (240 g)
Instructions
- Preheat oven to 400°F (200°C) and prepare a baking sheet.
- Season and warm the cooked protein in a skillet with olive oil and spices.
- Spread tortilla chips in an even layer and sprinkle with half of the cheese.
- Add protein, beans, corn, bell pepper, onion, and jalapeño evenly.
- Top with remaining cheese.
- Bake for 10–12 minutes until cheese is melted and bubbly.
- Garnish with tomatoes, green onions, and cilantro. Serve with sour cream and guacamole.
Notes
For best results, serve immediately after baking. Customize toppings as desired, but always layer cheese directly on the chips to maintain crispness.
- Prep Time: 15 minutes
- Cook Time: 12 minutes