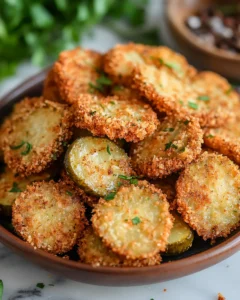
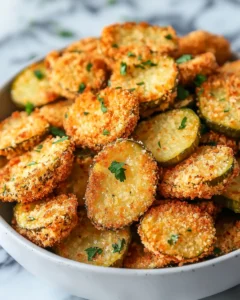
Crispy, salty, and perfectly seasoned, Crunchy Air Fryer Fried Pickles bring classic comfort-food flavor right into your home kitchen. They are the ideal snack when you want something fun and exciting without much effort. Whether you are planning a relaxed movie night with the family, preparing for a big game-day celebration, or simply craving a restaurant-style appetizer at home, these pieces of golden-brown pickle goodness always hit the spot.
This recipe is inspired by Southern diner traditions, where fried pickles are a must-try favorite. Today, they are popping up on restaurant menus everywhere because people love that irresistible combination of tangy pickles and crunchy breading. Thanks to the air fryer, you can now enjoy the same crispy texture using significantly less oil, making this addictive snack lighter without losing any of the flavor. One bite and you will understand why they disappear as fast as they hit the plate.
Why This Recipe Works
Crunchy Air Fryer Fried Pickles are incredibly popular because they deliver:
-
Crispy goodness without deep frying
-
Quick prep and cook time
-
An affordable, crowd-pleasing appetizer
-
Kid-friendly flavors
-
A lighter version of a classic favorite
If you’re new to using an air fryer or looking for an appetizer that is easy and fun, this recipe promises success every time.
Ingredients
Here’s everything you will need to bring this delicious snack to life:
-
1 (16-ounce) jar dill pickle chips (drained and patted dry)
-
1 cup all-purpose flour
-
2 large eggs, beaten
-
1¼ cups panko breadcrumbs
-
1 teaspoon garlic powder
-
1 teaspoon onion powder
-
½ teaspoon smoked paprika
-
½ teaspoon salt
-
¼ teaspoon black pepper
-
Cooking spray (for coating the air fryer basket and pickles)
Each ingredient contributes to the perfect crisp—flour sticks to the pickles, egg binds everything together, and panko creates the irresistible crunch.
Step-by-Step Directions
Follow these detailed steps to ensure your Crunchy Air Fryer Fried Pickles come out perfectly every time. By taking your time with preparation and following each step carefully, you’ll achieve that irresistible, golden-brown crunch that rivals your favorite diner-style fried pickles.
1. Preheat the Air Fryer
Before starting, set your air fryer to 400°F (200°C) and allow it to preheat for about 3–5 minutes. Preheating is an essential step that many people skip, but it makes a significant difference in achieving a perfectly crisp coating. A preheated air fryer ensures that the pickles begin cooking immediately when they hit the basket, giving the exterior a golden crunch while keeping the interior tender and flavorful.
Tip: If your air fryer does not have a preheat function, simply run it at 400°F empty for five minutes. This extra heat will mimic preheating and help your fried pickles cook evenly.
2. Dry the Pickle Slices
Draining and drying your pickles is one of the most critical steps to avoid soggy fried pickles. Spread your pickle chips on a layer of paper towels or a clean kitchen cloth. Gently pat each slice with another paper towel to remove excess moisture.
Pickles contain a lot of liquid, and if that liquid is left on the surface, it will prevent the flour and panko coating from adhering properly. A dry surface ensures the seasoning sticks well, and it also prevents the coating from falling off during cooking. For best results, let the pickles sit on the paper towels for a few minutes to absorb as much liquid as possible.
Pro Tip: For an extra-crisp coating, consider lightly sprinkling the pickle slices with a pinch of flour after patting them dry. This thin layer helps the egg stick better.
3. Prepare Your Coating Bowls
Setting up your dipping station before you start frying makes the process smooth and efficient. You will need three shallow bowls for a standard breading method, often called the dredge method.
Bowl 1: Mix 1 cup all-purpose flour with 1 teaspoon garlic powder, 1 teaspoon onion powder, ½ teaspoon smoked paprika, ½ teaspoon salt, and ¼ teaspoon black pepper. The seasoned flour adds depth to the flavor and helps the egg coating adhere.
Bowl 2: Beat 2 large eggs until fully combined. This egg wash acts as a glue between the flour and breadcrumb layers.
Bowl 3: Place 1¼ cups panko breadcrumbs in the final bowl. Panko breadcrumbs are preferred over regular breadcrumbs because they produce a lighter, crunchier texture that air fries beautifully.
Tip: If you want to add extra flavor, you can mix dried parsley, dill, or paprika into the panko for a visually appealing and flavorful crust.
4. Coat Each Pickle
The coating process is where your pickles are transformed from ordinary slices into a crispy snack. Follow these steps carefully for the best results:
-
Flour: Drop a pickle chip into the seasoned flour. Shake off any excess so it is evenly coated but not clumpy.
-
Egg: Dip the floured pickle into the beaten eggs, making sure it is fully covered. The egg wash ensures the breadcrumbs stick.
-
Panko: Press the pickle firmly into the panko crumbs until it is evenly coated. Don’t be afraid to gently pat the crumbs into the surface to create a thicker, crunchier crust.
Pro Tip: Coat the pickles one at a time for consistency. Multi-tasking can cause the coating to clump or fall off.
5. Load the Air Fryer Basket
Spray your air fryer basket lightly with cooking spray to prevent sticking. Arrange the coated pickle slices in a single layer, making sure they are not overlapping. Overcrowding the basket will prevent the hot air from circulating evenly, which could result in uneven cooking and soggy coating.
If you have a smaller air fryer, it is better to cook in multiple batches. This ensures that each pickle has enough space for the air to crisp every side.
Tip: Spray the tops of the pickles lightly with cooking spray. This step mimics the effect of deep-frying by promoting browning and crunchiness without extra oil.
6. Crisp to Perfection
Set the air fryer to cook for 7–10 minutes, flipping the pickles halfway through. The exact time may vary depending on the thickness of your pickle slices and your air fryer model. The flipping step ensures that both sides achieve a uniform golden-brown color and a consistent crunch.
Keep an eye on them toward the end of the cooking time. Panko breadcrumbs brown quickly, and a few extra minutes can make the difference between perfectly golden and slightly burnt.
Pro Tip: If you are cooking multiple batches, you can keep the finished pickles warm in a low oven at 200°F (95°C) while you cook the remaining batches. This way, everyone gets to enjoy them warm and crispy together.
7. Serve Immediately
The final step is to enjoy the fruits of your labor! Transfer the fried pickles to a serving plate or basket and serve immediately. Fried pickles are best eaten hot and fresh because the crisp coating will soften if left to sit too long. Pair with your favorite dipping sauces, such as ranch, chipotle mayo, or honey mustard, for an irresistible snack that disappears quickly.
Tip: For extra flair, sprinkle a small amount of freshly chopped parsley or dill on top for a professional-looking presentation.
By carefully following each of these steps, you’ll create restaurant-quality Crunchy Air Fryer Fried Pickles that are golden, flavorful, and perfectly crisp every time. Whether serving them as an appetizer for a party, a side for burgers, or a snack for yourself, this method ensures consistent success, even for beginners.
These detailed directions not only guarantee a delicious end result but also teach helpful techniques like patting, dredging, and air fryer management, skills you can use for countless other crispy snacks in the future.
Helpful Tips for the Best Crunch
-
Really dry the pickles before coating.
-
Use panko breadcrumbs for superior texture.
-
Do not overcrowd the basket—cook in batches if needed.
-
Flip halfway through for even browning.
-
Serve right away after cooking for maximum crunch.
These small steps make a big difference in the final result.
Flavor Variations
Customize the seasoning to match the occasion:
| Style | What to Add |
|---|---|
| Spicy | ½ teaspoon cayenne or chipotle powder in the flour |
| Ranch-Inspired | 1 tablespoon dry ranch seasoning in the panko |
| Cajun-Style | 1 teaspoon Cajun seasoning in the flour |
| Herby | 1 teaspoon dried dill or parsley into panko |
Whether mild or bold, these variations allow for endless snacking excitement.
Best Dipping Sauces
Pair these crispy bites with your favorite dips for added flavor:
-
Homemade ranch dressing
-
Creamy garlic dip
-
Honey mustard
-
Chipotle mayo
-
Spicy ketchup
-
Zesty barbecue sauce
Mix and match for taste-testing fun.
Which Pickles Work Best?
Dill pickle chips are the most popular choice because they are:
-
Pre-sliced for easy cooking
-
Tangy and well-seasoned
-
The perfect bite-size shape
However, you can also use:
-
Pickle spears for a thicker, crunchier appetizer
-
Bread-and-butter pickles for a touch of sweetness
-
Spicy dill varieties if you love heat
The important part is drying them well before coating.
Make-Ahead and Storage Tips
Planning ahead? Here is what you need to know:
Preparing in Advance
-
Coat the pickles and store covered in the refrigerator up to 4 hours before air frying.
Storing Leftovers
Fried pickles are always best the day they are made, but leftovers can be saved:
-
Store in an airtight container
-
Keep refrigerated up to 2 days
Reheating
To regain the crispiness, reheat in the air fryer at 375°F (190°C) for 3–5 minutes. Avoid microwaves, which soften the coating.
Serving Suggestions
These crunchy air fryer fried pickles pair well with:
-
Family game nights
-
Sports parties
-
Picnic platters
-
Burgers and fries
-
Summer cookouts
-
Casual weekend snacking
They are fun, finger-friendly, and easy to share—perfect for any relaxed gathering.
Nutritional Benefits
While fried pickles are a comfort snack, using the air fryer improves their nutritional profile:
-
Much less oil than deep frying
-
Lower overall calories and fat
-
A fun way to enjoy pickles rich in flavor and electrolytes
It is a win-win: big taste without the greasy aftermath.
Frequently Asked Questions
Can I use regular breadcrumbs instead of panko?
Yes, but panko gives a noticeably crispier result. If possible, stick to panko.
Can I use whole pickles and slice them myself?
Absolutely. Just cut into ¼-inch thick slices and dry thoroughly before coating.
Can this recipe be made gluten-free?
Yes. Use gluten-free flour and gluten-free breadcrumbs for an excellent result.
How do I prevent the breading from falling off?
Press the panko gently into the pickle surface and avoid moving them too much once in the air fryer.
Do I need to flip them?
Flipping creates a more even crunch on both sides, so it is highly recommended.
Print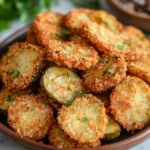
Crunchy Air Fryer Fried Pickles
- Total Time: 20 minutes
- Yield: 4–6 servings 1x
Description
A crispy, tangy snack that’s perfect for game day, movie night, or casual gatherings. Using an air fryer makes them lighter than traditional fried pickles while keeping that irresistible crunch.
Ingredients
-
1 (16-ounce) jar dill pickle chips, drained and patted dry
-
1 cup all-purpose flour
-
2 large eggs, beaten
-
1¼ cups panko breadcrumbs
-
1 teaspoon garlic powder
-
1 teaspoon onion powder
-
½ teaspoon smoked paprika
-
½ teaspoon salt
-
¼ teaspoon black pepper
-
Cooking spray
Instructions
-
Preheat the air fryer to 400°F (200°C).
-
Spread pickle chips on a paper towel and pat dry to remove excess moisture.
-
Prepare three shallow bowls:
-
Bowl 1: Combine flour, garlic powder, onion powder, smoked paprika, salt, and pepper.
-
Bowl 2: Beat the eggs.
-
Bowl 3: Add panko breadcrumbs.
-
-
Coat each pickle: first in flour, then dip into the egg, and finally press into the panko until fully coated.
-
Lightly spray the air fryer basket with cooking spray. Arrange pickles in a single layer without overlapping.
-
Spray tops of pickles lightly with cooking spray.
-
Cook 7–10 minutes, flipping halfway through, until golden and crispy.
-
Serve immediately with your favorite dipping sauce.
Notes
-
Pat pickles dry to ensure the coating sticks and stays crisp.
-
Use panko breadcrumbs for a lighter, crunchier texture.
-
Avoid overcrowding the air fryer; cook in batches if needed.
-
Serve hot for maximum crispiness and flavor.
- Prep Time: 10 minutes
- Cook Time: 10 minutes