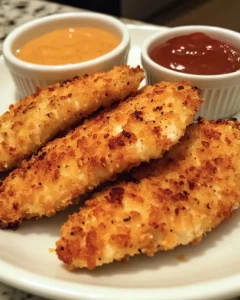
Homemade baked chicken tenders are the perfect solution for nights when you want something comforting, crunchy, and delicious without the fuss of frying. Whether you’re making a family-friendly dinner, planning a casual gathering with friends, or prepping a quick protein option for weekday lunches, these tenders bring that nostalgic restaurant-style flavor right into your own kitchen. They’re golden on the outside, tender and juicy inside, and ideal for dipping in your favorite sauces.
This recipe was inspired by the classic chicken strip baskets you might remember from childhood outings or weekend celebrations. But instead of relying on deep-frying or overly processed meals, this homemade version uses wholesome ingredients and a baking method that keeps them lighter yet still satisfyingly crisp. It’s also incredibly customizable, making it easy to adjust seasonings for different flavor profiles. Whether enjoyed fresh from the oven or packed for a next-day lunch, these baked chicken tenders are bound to become a household favorite.
Why You’ll Love This Recipe
-
Crispy without the fryer – Baked to perfection with a satisfying crunch.
-
Kid-friendly and adult-approved – Great for picky eaters and food lovers alike.
-
Simple pantry ingredients – No complicated steps or hard-to-find items.
-
Healthier than fast food – Lean protein and oven baking help keep it nutritious.
-
Meal prep ready – Make a large batch and reheat easily throughout the week.
-
Versatile flavors – Switch up seasonings or breadcrumbs based on your mood.
Ingredients
For the Chicken Tenders
-
1 ½ pounds chicken tenderloins (or chicken breasts cut into strips)
-
1 cup all-purpose flour
-
2 cups breadcrumbs (panko or regular)
-
2 large eggs
-
1 teaspoon salt
-
1 teaspoon black pepper
-
1 teaspoon garlic powder
-
1 teaspoon onion powder
-
1 teaspoon paprika (regular or smoked)
-
2 tablespoons olive oil or melted butter (for brushing or drizzling)
Optional Dipping Sauces
-
Honey mustard
-
Ketchup
-
Ranch dressing
-
Barbecue sauce
-
Spicy mayo
Step-by-Step Directions
-
Prepare the oven and pan
-
Preheat your oven to 425°F (220°C).
-
Line a baking sheet with parchment paper or lightly grease a wire rack placed on the sheet for maximum crispiness.
-
-
Season the chicken
-
Pat the chicken tenders dry with paper towels.
-
Lightly sprinkle salt and pepper over the chicken.
-
-
Set up the coating station
-
Place flour in a shallow bowl and season with a pinch of the paprika, garlic powder, and onion powder.
-
In a second bowl, whisk the eggs until smooth.
-
In a third bowl, mix breadcrumbs with the remaining spices.
-
-
Dredge and coat
-
Dip each piece of chicken into flour, shaking off any excess.
-
Transfer to the egg mixture, coating fully.
-
Roll in breadcrumbs, pressing gently to help the crumbs stick.
-
-
Arrange on the baking sheet
-
Place coated tenders on the lined tray or wire rack.
-
Lightly drizzle or brush olive oil over the tops to help browning.
-
-
Bake until crispy
-
Bake for 18–22 minutes, turning once halfway through.
-
Cook until the coating is golden and internal temperature reaches 165°F (74°C).
-
-
Serve warm
-
Pair with your favorite dipping sauces and side dishes.
-
Prep & Cook Time
-
Prep Time: 15 minutes
-
Cook Time: 20 minutes
-
Total Time: 35 minutes
-
Yield: 4 servings
What Makes These Chicken Tenders Special
Many homemade chicken tender recipes fail to achieve that crispy texture we crave, especially when baked. The secret here lies in three elements:
-
High heat – Ensures a crunchy exterior while keeping the meat juicy.
-
Panko breadcrumbs – Create a lighter, crispier coating compared to traditional crumbs.
-
A light drizzle of oil – Helps the outside brown beautifully without soaking the coating.
Additionally, the seasoning blend infuses each layer of the coating with flavor — you don’t end up with bland chicken hiding under crumbs. Every bite delivers savory, well-seasoned goodness.
Tips for Success
-
Use chicken tenderloins when possible – They are naturally juicy and uniform in size for easier cooking.
-
Don’t skip drying the chicken – Helps the coating stick better.
-
Use a wire rack if available – Allows airflow under the tenders for even crisping.
-
Press breadcrumbs firmly – Prevents flaking or falling off while baking.
-
Let them rest briefly before serving – Helps the coating set.
These easy practices elevate your tenders to restaurant-worthy level without extra effort.
Flavor Variations
Want to switch things up? Try these delicious seasoning ideas:
-
Spicy Kick – Add cayenne pepper or chili powder to the crumb mix.
-
Italian Style – Mix in grated Parmesan and Italian seasoning.
-
Coconut Crunch – Replace half the breadcrumbs with shredded unsweetened coconut.
-
Lemon Pepper – Add lemon zest or lemon pepper seasoning for brightness.
-
Herb Garden – Mix in dried parsley, thyme, or rosemary.
This recipe is like a blank canvas — make it your own.
Best Dipping Sauces for Chicken Tenders
The right dip makes every bite better. Try these tasty options:
-
Classic Honey Mustard – Sweet, tangy, and always a crowd-pleaser
-
Creamy Ranch – Especially great for kids
-
Barbecue Sauce – Adds smoky depth
-
Buffalo Sauce with Ranch – A little heat balanced with cool creaminess
-
Garlic Aioli – Perfect for garlic lovers
Pro tip: Serve multiple dips for a fun platter-style meal.
Healthy & Nutritious Benefits
These baked chicken tenders offer:
-
Lean protein – Supports muscle growth and keeps you full longer.
-
Lower fat – Baking helps reduce unnecessary oils.
-
Balanced ingredients – A great option for active families and growing teens.
For an even more nutrient-rich version, try swapping all-purpose flour for whole-wheat flour or using whole-grain breadcrumbs.
Side Dish Pairings
Here are some delicious combinations to turn your tenders into a full meal:
Comfort Food Classics
-
Mashed potatoes
-
Mac and cheese
-
Baked fries or potato wedges
Fresh & Light
-
Garden salad with vinaigrette
-
Steamed green beans
-
Roasted broccoli or carrots
Lunchbox Favorites
-
Fresh fruit
-
Mini veggie sticks with dip
-
Buttered corn
Choose based on your mood — whether you want hearty comfort or a balanced plate.
How to Store & Reheat
Homemade chicken tenders are fantastic for leftovers and meal prep. Here’s how to keep them fresh and crispy:
Refrigerator
-
Store in an airtight container for up to 3 days.
Freezer
-
Freeze cooked tenders individually on a tray for 1–2 hours.
-
Transfer to a freezer-safe bag for up to 2 months.
Reheat
-
Oven: 400°F (200°C) for 8–10 minutes
-
Air fryer: 5–7 minutes at 375°F (190°C)
-
Microwave: Not recommended (softens the coating)
Reheating in the oven or air fryer restores that amazing crunch.
Common Mistakes to Avoid
-
Over-crowding the baking sheet
Leave space around each tender so they bake — not steam. -
Skipping the oil
Just a small drizzle helps color and texture dramatically. -
Uneven sizes
Cut chicken pieces evenly so they finish cooking at the same time. -
Not checking doneness
Use a meat thermometer to ensure food safety and perfect juiciness.
Frequently Asked Questions
Can I make these gluten-free?
Yes. Simply use gluten-free flour and breadcrumbs to match your needs. The process stays the same, and the results are still crispy and tasty.
Can I use chicken breasts instead of tenderloins?
Absolutely. Slice the chicken into even strips about 1 inch wide to ensure consistent cooking.
Can I bake them without eggs?
Yes. Replace eggs with a mixture of milk or plain yogurt to help the breadcrumbs adhere.
Can I air-fry the chicken tenders instead?
Yes, you can. Cook at 375°F (190°C) for 12–15 minutes, flipping once halfway through. They will turn out beautifully crisp.
Serving Ideas for Different Occasions
Family Dinner Night
Serve with crispy fries and salad for a fun, satisfying meal.
Game Day Snacks
Pile tenders on a platter with a variety of dipping sauces — guaranteed crowd favorite.
School Lunches
Add a few tenders to a bento box with fruit and veggies for a balanced, exciting lunch.
Picnics and Outdoor Meals
Wrap tenders in foil after baking; pair with finger-friendly sides.
From casual dining to celebrations, these tenders fit right in.
Make-Ahead Tips
If you’re planning meals in advance:
-
Coat chicken and refrigerate up to 12 hours before baking.
-
Freeze uncooked coated tenders and bake from frozen; just add a few extra minutes of cook time.
-
Store extra sauce in sealed containers for quick serving later.
These prep options help you save time while still cooking fresh food.
Final Thoughts
Delicious Homemade Baked Chicken Tenders are proof that simple ingredients can transform into something truly special. This recipe captures the crispy texture everyone craves while keeping the meal lighter and nourishing. It’s flexible enough for weeknight cooking, crowd-pleasing enough for gatherings, and fun enough to win over even the pickiest eaters.
When you serve these tenders, you’re not just making dinner — you’re creating comfort, happiness, and memories around the table. Whether you enjoy them dipped in your favorite sauce, paired with classic sides, or packed for lunch, they are sure to become a staple that everyone asks for again and again.
Time to grab those ingredients, preheat the oven, and bake up a batch of crisp, juicy chicken tenders that taste better than any takeout option. Delicious, homemade, and full of joy — that’s what good cooking is all about.
Print
Delicious Homemade Baked Chicken Tenders
- Total Time: 35 minutes
- Yield: 4 servings 1x
Description
These crispy, juicy baked chicken tenders are a healthier and more flavorful alternative to fast food versions. They’re easy to make, kid-friendly, and perfect for weeknight dinners, meal prep, or serving with your favorite dipping sauces.
Ingredients
1 ½ pounds chicken tenderloins or chicken breasts cut into strips
1 cup all-purpose flour
2 cups breadcrumbs (panko or regular)
2 large eggs
1 teaspoon salt
1 teaspoon black pepper
1 teaspoon garlic powder
1 teaspoon onion powder
1 teaspoon paprika
2 tablespoons olive oil or melted butter for brushing or drizzling
Optional: dipping sauces like honey mustard, ranch, or barbecue
Instructions
-
Preheat your oven to 425°F (220°C). Line a baking sheet with parchment paper or place a wire rack on top of the sheet and lightly grease it.
-
Pat the chicken dry with paper towels and season lightly with salt and pepper.
-
Set up three shallow bowls: one with flour and a pinch of seasonings, one with whisked eggs, and one with breadcrumbs mixed with the remaining spices.
-
Dredge each chicken strip in the flour, shaking off excess.
-
Dip into the egg mixture, coating fully.
-
Roll each piece in the breadcrumb mixture, pressing gently so it sticks well.
-
Arrange the coated tenders on the prepared baking sheet or rack.
-
Lightly drizzle or brush olive oil on top to help them crisp in the oven.
-
Bake for 18–22 minutes, flipping once halfway through, until the outside is golden and internal temperature reaches 165°F (74°C).
-
Serve warm with your favorite dipping sauces.
Notes
Use chicken tenderloins for the most tender results or slice chicken breasts evenly to ensure uniform cooking. For extra crispiness, use a wire rack to allow airflow underneath. You can also make these gluten-free by using gluten-free flour and breadcrumbs. Store leftovers in the refrigerator for up to 3 days and reheat in the oven or air fryer for best texture.
- Prep Time: 15 minutes
- Cook Time: 20 minutes