Game day food is all about bold flavors, easy sharing, and dishes that disappear almost as quickly as they hit the table. Whether you are hosting friends for a big game, planning a casual weekend gathering, or simply craving something indulgent and comforting, cheeseburger bombs are the kind of snack that instantly wins people over. Warm, cheesy, and packed with savory flavor, they are designed for dipping, sharing, and reaching for seconds without hesitation.
These Game Day Garlic Parmesan Cheeseburger Bombs Gone in Minutes were inspired by classic cheeseburgers and crowd-favorite finger foods. By wrapping seasoned beef and melted cheese inside soft dough and finishing them with a garlic parmesan coating, this recipe turns familiar flavors into a fun, handheld bite. They feel festive and satisfying without requiring complicated techniques, making them perfect for both experienced cooks and beginners. Once you serve them, do not be surprised if the tray empties faster than expected.
Why Cheeseburger Bombs Are Perfect for Game Day
Cheeseburger bombs check every box when it comes to game day snacks. They are portable, mess-friendly, and easy to eat while watching the action. Unlike traditional burgers, there is no need for plates or utensils, which keeps things simple for guests and hosts alike.
Another reason these bites shine is their built-in portion control. Each bomb delivers a balanced bite of beef, cheese, and bread, making them ideal for grazing. Guests can enjoy one or several without feeling overwhelmed, which is perfect for long events where food is served over time.
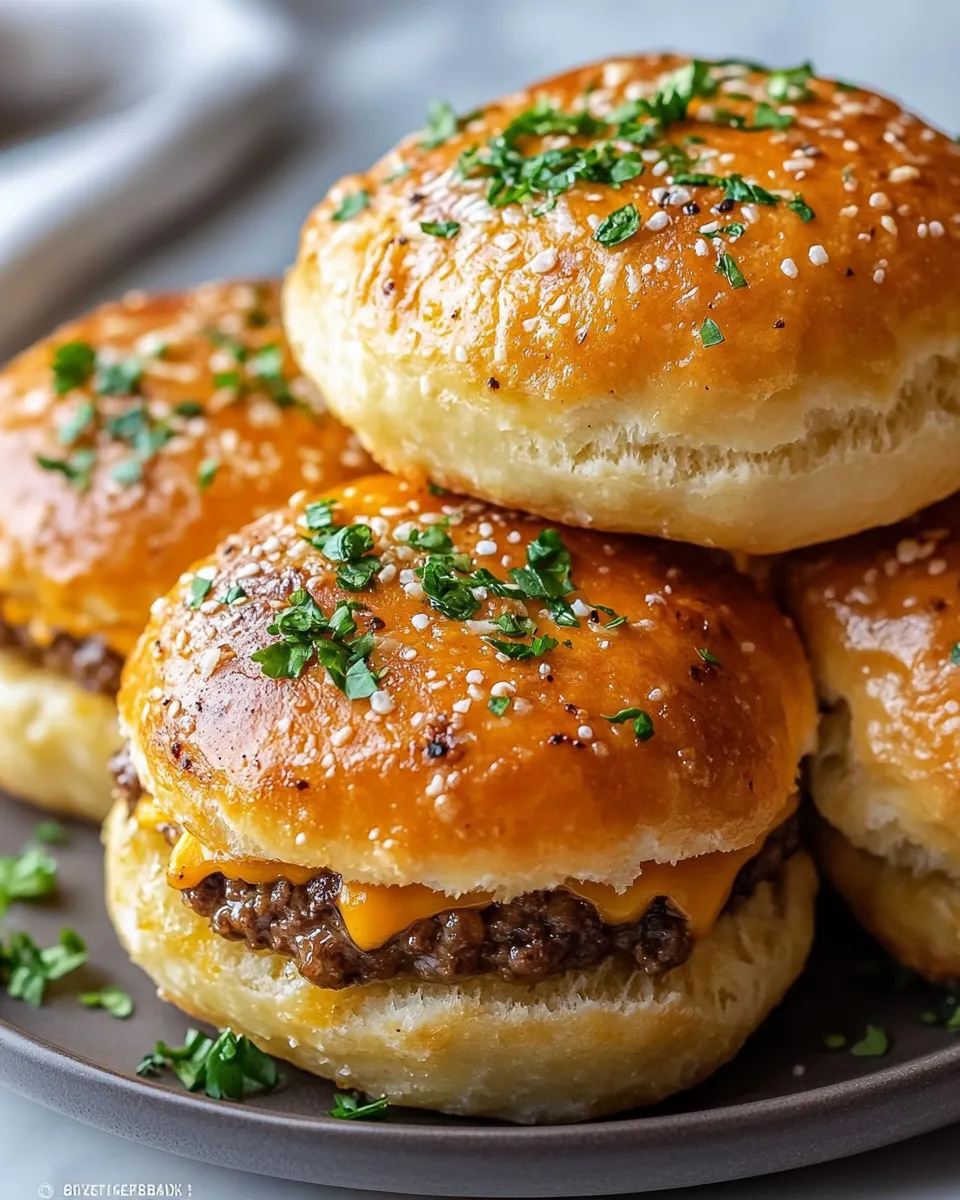
The garlic parmesan coating takes these cheeseburger bombs to the next level. It adds a rich, savory finish that feels indulgent and memorable. Combined with melty cheese and seasoned beef, every bite feels intentional and satisfying. This balance of comfort and flavor is why these bombs are often the first thing to disappear from the table.
Ingredients for Garlic Parmesan Cheeseburger Bombs
Carefully measured ingredients ensure consistent flavor and texture every time.
-
Ground beef – 1 pound (450 g)
-
Olive oil – 1 tablespoon (15 ml)
-
Salt – 1 teaspoon (6 g)
-
Black pepper – ½ teaspoon (2 g)
-
Garlic powder – 1 teaspoon (3 g)
-
Onion powder – 1 teaspoon (3 g)
-
Paprika – ½ teaspoon (1 g)
-
Cheddar cheese cubes – 6 ounces (170 g), cut into 24 pieces
-
Refrigerated biscuit dough – 1 can (16 ounces / 450 g), 8 biscuits cut into quarters
-
Unsalted butter – 4 tablespoons (56 g), melted
-
Minced garlic – 2 teaspoons (6 g)
-
Grated parmesan cheese – ½ cup (50 g)
-
Dried parsley – 1 teaspoon (1 g)
These ingredients combine to create a filling that is flavorful and juicy, wrapped in soft dough and finished with a savory garlic parmesan topping.
Choosing the Best Ingredients
For the beef, lean ground beef works best, ideally around 85% lean. This provides enough fat for flavor without making the filling greasy. Seasoning the beef well is important since it forms the flavor foundation of the recipe.
Cheddar cheese is a classic choice for cheeseburger bombs because it melts smoothly and delivers familiar flavor. Cutting the cheese into even cubes ensures consistent melting inside each bomb.
Refrigerated biscuit dough makes preparation easy and reliable. It bakes up soft and fluffy while holding the filling securely. Using fresh garlic and real parmesan cheese enhances the topping and adds depth that packaged seasonings cannot match.
Step-by-Step Instructions
Cook the Beef
Begin by heating olive oil in a large skillet over medium heat. Allow the oil to warm fully so the beef starts cooking immediately when added. Place the ground beef into the skillet and use a spatula or wooden spoon to break it apart into small, even crumbles. This helps the meat cook uniformly and ensures that each bite of the finished bombs has balanced flavor.
Season the beef with salt, black pepper, garlic powder, onion powder, and paprika while it cooks. Adding the seasoning early allows the flavors to infuse into the meat rather than just coating the surface. Continue cooking for 6 to 8 minutes, stirring occasionally, until the beef is evenly browned and fully cooked through. If there is excess fat in the skillet, carefully drain it off to prevent the filling from becoming greasy. Set the cooked beef aside and allow it to cool slightly. Cooling is important, as hot filling can soften the dough too quickly and make it harder to seal.
Prepare the Dough
While the beef cools, preheat the oven to 375°F (190°C). Proper preheating ensures the dough bakes evenly and puffs up beautifully. Line a baking sheet with parchment paper to prevent sticking and to make cleanup easier.
Open the biscuit dough and separate each biscuit. Using a sharp knife or dough cutter, cut each biscuit into four equal pieces. You should end up with 24 small dough portions. Try to keep the pieces similar in size so they bake at the same rate. Place the dough pieces on a clean surface and cover lightly with a towel to keep them from drying out while you assemble the bombs.
Assemble the Cheeseburger Bombs
Working with one piece of dough at a time, gently flatten it into a small circle using your fingers or the palm of your hand. The dough should be thin enough to wrap around the filling but not so thin that it tears. Aim for an even thickness throughout.
Place about 1 tablespoon (15 g) of the cooked beef in the center of the dough. Avoid overfilling, as too much filling can cause the dough to split during baking. Add one cube of cheddar cheese on top of the beef. The cheese should be fully enclosed to prevent leaking as it melts.
Carefully bring the edges of the dough up and around the filling. Pinch the seams together firmly, twisting slightly if needed, to ensure a tight seal. Roll the sealed dough gently between your hands to form a smooth ball. Repeat the process with the remaining dough pieces, beef, and cheese, checking each one to make sure it is completely sealed.
Bake Until Golden
Place the assembled cheeseburger bombs seam-side down on the prepared baking sheet. Space them evenly, leaving room for the dough to expand as it bakes. Positioning them seam-side down helps keep them sealed and creates a smooth, golden top.
Transfer the baking sheet to the preheated oven and bake for 14 to 16 minutes. As they bake, the dough will puff up and turn a deep golden brown. Keep an eye on them during the last few minutes to prevent overbrowning. When done, the bombs should be fully cooked, with a crisp exterior and a soft, fluffy interior.
Make the Garlic Parmesan Coating
While the bombs are in the oven, prepare the garlic parmesan coating. In a small bowl, combine melted butter, minced garlic, grated parmesan cheese, and dried parsley. Stir well until the ingredients are fully blended. This coating adds rich flavor and aroma, elevating the finished bombs and giving them a savory, bakery-style finish.
Finish and Serve
Remove the cheeseburger bombs from the oven and immediately brush them generously with the garlic parmesan mixture. The heat from the bombs helps the butter soak in and the cheese adhere to the surface. Allow them to cool for just a minute or two, then serve warm for the best flavor and texture. Each bite delivers a satisfying combination of savory beef, melted cheese, and soft, golden dough.

Tips for Perfect Cheeseburger Bombs
Allowing the beef to cool slightly before assembly helps prevent the dough from becoming too soft. Sealing the dough tightly is essential to keep the cheese from leaking during baking.
Spacing the bombs evenly ensures even browning. Brushing the garlic parmesan topping while the bombs are hot allows it to soak in slightly, maximizing flavor without making them soggy.
Serving Suggestions
These cheeseburger bombs are excellent on their own, but they also pair well with dipping sauces. Classic ketchup, mustard blends, or creamy dips complement the savory filling nicely.
For a complete game day spread, serve them alongside fresh vegetables, crispy potatoes, or light salads. Their rich flavor balances well with simpler sides, creating a well-rounded table.
Make-Ahead and Storage Tips
The beef filling can be prepared up to one day in advance and stored in the refrigerator. When ready to serve, assemble and bake fresh for best results.
Leftover cheeseburger bombs can be stored in an airtight container in the refrigerator for up to two days. Reheat them in the oven at 325°F (165°C) until warmed through to maintain texture.
Frequently Asked Questions
Can I use a different type of cheese?
Yes, mozzarella, mild cheddar blends, or Colby cheese all work well. Choose a cheese that melts smoothly and complements the seasoned beef.
How do I prevent cheese from leaking out?
Make sure the dough is sealed completely around the filling. Pinch seams firmly and place bombs seam-side down on the baking sheet.
Are cheeseburger bombs good for large crowds?
Absolutely. This recipe doubles easily and can be baked in batches. They are ideal for parties because they are easy to serve and eat.
Can I bake these ahead of time and reheat?
They are best served fresh, but you can reheat baked bombs in the oven to restore warmth and texture. Avoid microwaving, as it can soften the dough too much.
Final Thoughts
These Game Day Garlic Parmesan Cheeseburger Bombs Gone in Minutes capture everything people love about comfort food and party snacks. They are warm, cheesy, and packed with familiar flavors that feel both indulgent and satisfying. Their bite-sized format makes them perfect for sharing, while the garlic parmesan finish adds a memorable twist that sets them apart.
What makes this recipe especially valuable is its simplicity. With straightforward ingredients and easy steps, it delivers impressive results without stress. That balance makes it ideal for busy hosts who still want to serve something special.
These cheeseburger bombs also encourage creativity. You can adjust seasonings, experiment with cheese varieties, or pair them with different dips to suit your crowd. That flexibility ensures they remain exciting even after multiple occasions.
Once you add these to your game day menu, they are likely to become a regular favorite. They disappear quickly, earn compliments easily, and bring people together around the table, which is exactly what great game day food should do.
Print
Game Day Garlic Parmesan Cheeseburger Bombs
- Total Time: 41 minutes
- Yield: 24 cheeseburger bombs
Description
Savory cheeseburger bombs filled with seasoned beef and melty cheese, finished with a rich garlic parmesan coating for the ultimate game day snack.
Ingredients
- Ground beef – 1 pound (450 g)
- Olive oil – 1 tablespoon (15 ml)
- Salt – 1 teaspoon (6 g)
- Black pepper – ½ teaspoon (2 g)
- Garlic powder – 1 teaspoon (3 g)
- Onion powder – 1 teaspoon (3 g)
- Paprika – ½ teaspoon (1 g)
- Cheddar cheese – 6 ounces (170 g), cubed
- Refrigerated biscuit dough – 16 ounces (450 g), cut into 24 pieces
- Unsalted butter – 4 tablespoons (56 g), melted
- Minced garlic – 2 teaspoons (6 g)
- Grated parmesan cheese – ½ cup (50 g)
- Dried parsley – 1 teaspoon (1 g)
Instructions
- Heat olive oil in a skillet and cook ground beef with seasonings until browned.
- Preheat oven to 375°F (190°C) and line a baking sheet.
- Flatten dough pieces and fill with beef and cheese cubes.
- Seal dough tightly around filling and place seam-side down.
- Bake for 14–16 minutes until golden.
- Mix butter, garlic, parmesan, and parsley.
- Brush baked bombs with garlic parmesan mixture and serve warm.
Notes
Seal dough carefully to prevent cheese leakage and brush topping while bombs are hot for maximum flavor.
- Prep Time: 25 minutes
- Cook Time: 16 minutes