
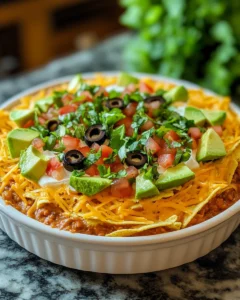
There’s something magical about gathering around a table filled with vibrant, shareable dishes, especially during game nights, family get-togethers, or festive celebrations. One recipe that never fails to bring people together is the classic 7-Layer Taco Dip. With its colorful layers, bold flavors, and irresistible creamy crunch, it’s the kind of dish that disappears within minutes.
I first discovered this recipe at a family gathering where everyone had brought a dish to share. Among all the options, this dip stood out—not just for its eye-catching presentation, but for its incredible balance of textures and flavors. Since then, it has become a staple in my kitchen, especially when I need something quick, satisfying, and guaranteed to impress.
Why You’ll Love This 7-Layer Taco Dip
This recipe checks all the boxes for a perfect appetizer. It’s simple to make, requires no cooking, and is incredibly customizable. Whether you’re hosting a party or just craving something flavorful, this dip delivers.
- No cooking required – Perfect for busy days
- Quick assembly – Ready in under 20 minutes
- Customizable layers – Adjust to your taste
- Perfect for sharing – Ideal for gatherings
- Bursting with flavor – Creamy, tangy, fresh, and crunchy
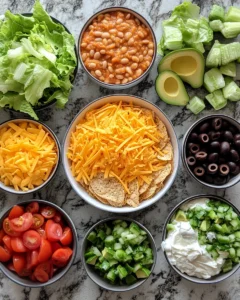
Ingredients You’ll Need
Each layer contributes to the overall flavor and texture, making this dip a well-balanced and satisfying dish.
Layer 1: Refried Beans
- 2 cups refried beans
- 1 teaspoon ground cumin
- 1/2 teaspoon garlic powder
Layer 2: Creamy Base
- 1 cup sour cream
- 1 cup cream cheese, softened
- 1 tablespoon taco seasoning
Layer 3: Guacamole
- 2 ripe avocados
- 1 tablespoon lime juice
- 1/4 teaspoon salt
- 2 tablespoons finely chopped onion
Layer 4: Salsa
- 1 cup chunky salsa (mild or medium based on preference)
Layer 5: Cheese
- 1 1/2 cups shredded cheddar cheese
Layer 6: Fresh Vegetables
- 1 cup chopped tomatoes
- 1/2 cup chopped lettuce
- 1/4 cup sliced black olives
Layer 7: Final Garnish
- 1/4 cup chopped green onions
Step-by-Step Instructions
1. Prepare the Bean Layer
In a bowl, mix the refried beans with cumin and garlic powder. Spread evenly across the bottom of a serving dish (a 9×13-inch dish works well).
2. Make the Creamy Layer
In another bowl, combine sour cream, cream cheese, and taco seasoning. Mix until smooth and spread over the bean layer.
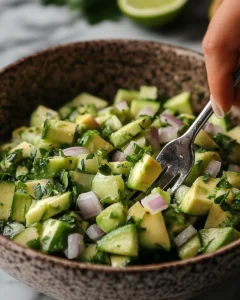
3. Prepare the Guacamole
Mash the avocados and mix with lime juice, salt, and chopped onion. Spread gently over the creamy layer.
4. Add the Salsa
Evenly spread the salsa over the guacamole layer. Be careful not to press too hard to keep layers distinct.
5. Sprinkle the Cheese
Add a generous layer of shredded cheddar cheese across the top.
6. Add Fresh Vegetables
Sprinkle chopped tomatoes, lettuce, and olives evenly.
7. Finish with Garnish
Top with chopped green onions for a fresh, vibrant finish.
Chill for at least 30 minutes before serving for the best flavor.
Tips for the Best Taco Dip
- Use fresh ingredients for maximum flavor
- Drain salsa slightly to avoid excess moisture
- Soften cream cheese beforehand for easier mixing
- Layer gently to maintain clean, visible layers
- Serve chilled for the best taste and texture
Creative Variations
This dip is incredibly versatile. Here are some fun ways to customize it:
Add Protein
- Shredded chicken (seasoned with taco spices)
- Seasoned ground beef or turkey
Make It Spicy
- Add diced jalapeños
- Use hot salsa
- Sprinkle chili flakes
Make It Lighter
- Use Greek yogurt instead of sour cream
- Opt for low-fat cream cheese
Add Extra Layers
- Corn kernels
- Black beans
- Diced bell peppers
What to Serve with 7-Layer Taco Dip
This dip pairs beautifully with a variety of dippers:
- Tortilla chips
- Pita chips
- Crackers
- Fresh veggie sticks (carrots, celery, cucumber)
Storage and Make-Ahead Tips
- Refrigeration: Store in an airtight container for up to 2 days
- Make ahead: Prepare a few hours in advance and refrigerate
- Avoid freezing: The texture won’t hold up well
Frequently Asked Questions
1. Can I make 7-layer taco dip ahead of time?
Yes, this dip is perfect for making ahead, which makes it especially convenient for parties and gatherings. Ideally, you can prepare it up to 6–8 hours in advance and store it in the refrigerator until serving time. However, there are a few things to keep in mind to ensure the best results. For example, the guacamole layer may start to brown over time due to oxidation. To prevent this, you can add extra lime juice or press plastic wrap directly onto the guacamole layer before adding the next layer.
Another tip is to add the fresh vegetable toppings, such as lettuce and tomatoes, just before serving. This keeps them crisp and vibrant instead of soggy. If you’re planning to prepare the dip the night before, consider assembling the base layers (beans, creamy mixture, guacamole, salsa, and cheese) and adding the final toppings the next day. This approach helps maintain both the texture and visual appeal of the dish.
Overall, making this dip ahead of time not only saves you effort on the day of your event but also allows the flavors to meld together beautifully, enhancing the overall taste.
2. How do I keep the layers from getting watery?
One of the most common issues with layered dips is excess moisture, which can make the dish look messy and affect the texture. To avoid this, it’s important to manage the moisture content of each ingredient carefully.
Start with the salsa—this is often the main culprit. If your salsa is particularly watery, strain it using a fine mesh sieve before adding it to the dip. This removes excess liquid while keeping the flavor intact. Similarly, make sure your chopped tomatoes are not overly juicy; you can remove some of the seeds if needed.
Another helpful tip is to use thick, well-mixed refried beans as your base layer. This creates a sturdy foundation that helps absorb some moisture from the upper layers. Additionally, ensure that your cream cheese mixture is thick and not overly runny.
When it comes to storage, always keep the dip refrigerated and covered tightly. Avoid leaving it at room temperature for extended periods, as this can cause ingredients to release more liquid. By taking these steps, you can maintain clean, distinct layers and a perfectly textured dip.
3. Can I make this dip vegetarian or vegan?
This recipe is naturally vegetarian as long as the refried beans and other ingredients do not contain animal-based additives. To make it vegan, a few simple substitutions can transform the dish without sacrificing flavor.
Replace the sour cream with a plant-based alternative such as dairy-free yogurt or vegan sour cream. For the cream cheese, there are many excellent vegan cream cheese options available that provide a similar creamy texture. The shredded cheese layer can also be swapped for a dairy-free cheese alternative or even nutritional yeast for a slightly different but delicious flavor.
For the guacamole and salsa layers, no changes are needed as they are already vegan-friendly. Just ensure that all packaged ingredients, such as taco seasoning and refried beans, are labeled vegan.
These substitutions make the dip inclusive for a wider range of dietary preferences while still delivering the bold, satisfying flavors that make it so popular.
4. What size dish should I use for this recipe?
The size of your dish plays an important role in both presentation and serving convenience. A standard 9×13-inch dish is ideal for this recipe, as it provides enough مساحة to spread each layer evenly without making them too thick or too thin. This size also makes it easy for guests to scoop out portions without mixing the layers too much.
If you’re serving a smaller group, you can use an 8×8-inch dish for a thicker, more compact version of the dip. Alternatively, you can create individual servings by layering the ingredients in small cups or jars—this is a great option for parties where you want to minimize mess and make serving easier.
For larger gatherings, consider doubling the recipe and using a larger serving tray or preparing multiple dishes. The key is to ensure that each layer is evenly distributed so that every bite delivers the full combination of flavors.
Final Thoughts
The 7-Layer Taco Dip is more than just an appetizer—it’s a celebration of flavor, color, and simplicity. Its layered presentation makes it visually stunning, while its combination of creamy, tangy, and fresh ingredients ensures that every bite is satisfying. Whether you’re hosting a party, attending a potluck, or simply enjoying a cozy night at home, this dip has a way of bringing people together.
One of the best things about this recipe is its adaptability. You can easily tweak the ingredients to suit your preferences, dietary needs, or whatever you have on hand. It’s forgiving, flexible, and always delicious. Even if you’re not an experienced cook, you’ll find this recipe approachable and rewarding.
Another reason this dip stands out is how it encourages sharing. There’s something inherently joyful about placing a beautifully layered dish in the center of the table and watching everyone dig in. It sparks conversation, laughter, and connection—something every great recipe should do.
If you’re looking for a dish that’s quick to prepare but leaves a lasting impression, this 7-Layer Taco Dip is exactly what you need. Once you make it, it’s likely to become a regular feature in your recipe collection. So grab your ingredients, start layering, and get ready to enjoy a dish that’s as fun to make as it is to eat.
Print
7-Layer Taco Dip: The Ultimate Crowd-Pleasing Appetizer
- Total Time: 20 minutes
- Yield: 8–10 servings 1x
Description
A vibrant, no-cook appetizer layered with creamy, fresh, and savory ingredients—perfect for parties and gatherings.
Ingredients
2 cups refried beans
1 teaspoon ground cumin
1/2 teaspoon garlic powder
1 cup sour cream
1 cup cream cheese, softened
1 tablespoon taco seasoning
2 ripe avocados
1 tablespoon lime juice
1/4 teaspoon salt
2 tablespoons chopped onion
1 cup chunky salsa
1 1/2 cups shredded cheddar cheese
1 cup chopped tomatoes
1/2 cup chopped lettuce
1/4 cup sliced black olives
1/4 cup chopped green onions
Instructions
Mix refried beans with cumin and garlic powder, then spread into a serving dish.
Combine sour cream, cream cheese, and taco seasoning; spread over beans.
Mash avocados with lime juice, salt, and onion; spread over creamy layer.
Add salsa evenly on top.
Sprinkle shredded cheese over salsa.
Add chopped tomatoes, lettuce, and olives.
Garnish with green onions and chill for 30 minutes before serving.
Notes
Drain salsa to prevent excess moisture
Add lettuce just before serving for freshness
Customize layers with your favorite toppings
- Prep Time: 20 minutes
- Cook Time: 0 minutes